Setting up and Recording Your Next Zoom Call
- David Anderson
- Sep 20, 2021
- 3 min read
Are you recording a Zoom meeting to edit the footage "in post"? Maybe you're delivering that footage to the ArchiteX team to edit into your custom broadcast. Here are some useful tips if you've decided to facilitate that recording through Zoom.
Please note, for the best product in the editing process, our preference is to have each participant in the recording session recorded as an isolated feed. To accomplish this, you must have a separate computer to record each isolated feed. Each computer must record locally with the participant they would like to record pinned for the duration of the recording.
Step 1: Dial in the Recording Settings
Once you've downloaded the latest version of Zoom, select Preferences in the Zoom.us menu.
This can also be found by clicking your profile icon on the top right of the home screen in the Zoom app, and then clicking 'Settings'.
Next, navigate to the Recording tab.
Use the 'Store my recordings at' dropdown menu to select a destination for your finished files.
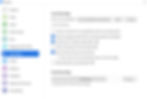
Next, make sure to check 'Record a separate audio file for each participant'. This might be one of the best features that Zoom offers for video editing because it will allow us to work with separate audio tracks in post.
Lastly, click Optimize for 3rd party video editor.
Step 2: Confirm Everyone's Video Settings
Before your recording session, it may be beneficial to send all participants a link to our PRESENTER RESOURCES PAGE, where they can learn how to set up their audio, lighting, and video in an optimal way.
Then, when everyone is connected, confirm everyone's video feeds. If you need to make tweaks, there are a few settings in the Video Tab that might be of interest to anybody who will be filmed in the recording. These are settings that would be changed on the participant's individual settings.

First, there's the 'Touch up my appearance' option. This will put a slight blur on the image to smooth out skin tones. If you have time to do this in post, we recommend leaving this off.
Second, be sure to enable HD. In theory, checking this option would allow you to broadcast a 720p video. However, we have had limited success in getting a full 720p signal from participants through Zoom. We still think it is worth enabling this setting.
Toggling this setting on/off can sometimes change the captured area of the camera feed. It may be helpful to experiment here to alter what portion of the feed is being utilized by Zoom.
Lastly, if you're utilizing any virtual backgrounds, you would direct each participant to navigate to the 'Background & Filters' tab to make those adjustments.
Step 3: Check Audio
As of September 2020, Zoom has introduced a new High Fidelity Professional Audio option. Selecting this setting disables several features such as echo-cancellation and post processing, and raises the codec specs to 48Khz, 96Kbps mono/192kbps stereo.
One drawback is that this feature requires a very fast internet connection, so Zoom recommends a hard Ethernet connection rather than WiFi.
To select this mode, head to the Audio Tab and navigate all the way down to click on Advanced.
Once you're there, check 'Show in-meeting option to "Enable Original Sound" from microphone' and then 'High fidelity music mode'. If the person speaking does not have headphones, please also have them enable 'Echo Cancellation'.
If you are recording music performances or interviews and have the bandwidth, we recommend that you have your participants enable this feature.

Step 4: Record!
Starting a recording on Zoom is very easy. To begin, just click on the Record button in the menu bar.
Please always record locally

IMPORTANT: If you are conducting an interview with somebody and would like to only record their video stream you must pin their video. Otherwise the video will cut back to you every time you or another participant speaks or makes a noise.
For the best product in the editing process, our preference is to have each participant in the recording session recorded as an isolated feed. To accomplish this, you must have a separate computer to record each isolated feed. Each computer must record locally with the participant they would like to record pinned for the duration of the recording.
Remember, the finished package of audio and video files will only be generated after you leave the Zoom meeting.
Would you prefer that we handle the recording process?
Reach out today and book our team!