Studio in a Box Support
Congratulations on your new Studio in a Box! Getting set up is easy. Simple assembly steps are outlined below.
Section 1: Camera Setup
Section 2: FAQ
Section 3: Support
If you are looking for more info on how to record yourself, please click here.
If you are looking for more info on how to connect to our video switcher via vMix Call for an ArchiteX produced event, please click here.
Camera Setup
You have received your Studio in a Box. And it is probably still in the box, so now what?
There's some light assembly required. Please follow the instructions below and don't hesitate to call our tech support if you have any questions throughout the process.
STEP 1
Take your Studio in a Box and place it on a desk or other level surface.

STEP 2
When you open the pelican case you will find the following items:
-
Camera with attached mic and tripod base
-
LED Light with mount attachment
-
HDMI to USB converter
-
Power bricks for camera and light with an AC/power plug
-
Straight extendable column mount for camera
-
Flexible goose-neck mount for light


STEP 3
-
Remove all items except for power bricks
-
Plug in both power bricks and leave them in the case
-
Close and latch the case

STEP 4
Once the case is closed you will find several cables outside of the case which include:
-
Camera mirco HDMI cable (next to camera mount base)
-
Camera charging cable (next to camera mount base)
-
Light charging cable (next to light mount base)
-
HDMI cable (coming from bottom right side of case)
-
Power cable (AC) (coming from bottom right side of case)


STEP 5
-
Attach the camera mount to the camera case
-
Attach the goose-neck lighting mount to the lighting base


STEP 6
Once both camera and light mounts are attached, you should have something that looks like this:

STEP 7
Don't forget to take lens cap off by squeezing the two clasps and pulling.

STEP 8
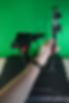
Attaching the camera:
-
Before placing the camera, make sure the camera mounting bracket is armed: the swing arm should be pushed to the side, exposing a silver button
-
Angle the camera as shown in the first photo, then press the camera down flat, engaging the tripod lock
-
You can utilize the wing adjustment on the left side of the camera bracket to adjust tilt up and down


STEP 9
Mounting the light is as simple as screwing the light into the mount.

STEP 10
Time to plug some cables into the camera:
-
Both power and HDMI cables come from the same location on the camera
-
Find the flap on the right side, facing the camera, and slide open the flap exposing the ports
-
-
Plug in the power cable (top port, see photo)
-
Plug in the HDMI cable (next port down, see photo)


STEP 11
Camera Mode:
Once the camera is turned on make sure it's set to 'Movie Mode' by setting the mode wheel to the film strip icon, as shown in photo below.

STEP 12
Cable for the LED Light:
Plug LED power cable into the back of the light.

STEP 13
Light Control:
Off/On and intensity is controlled from this control wheel (see photo).


Color temperature is controlled from this control wheel (see photo).


STEP 14
Last two cables coming from the bottom right side of the Studio in a Box case are the HDMI for the USB converter and the main power cable. Go ahead and plug the power cable into the nearest outlet.
There is more length of cable tucked in the bottom of the case and can be fed through the side port if more length is needed.
STEP 15
HDMI to USB Converter:
This is how you will get the signal, video and audio, from the camera into your computer. First plug in the HDMI cable into the converter, then plug the converter into a USB port on your computer.
STEP 16
You are connected and ready to go! You can select your new camera and mic from your desired streaming application.
If you are joining an ArchiteX production, you are likely using VMixCall. We have the most success calling in to VMixCall via the FireFox browser. When you enter VMixCall, Firefox will give you the option to select your camera and microphone options. Please select USB video device and USB audio device, exact names may differ.

FAQ
See the questions below for frequently asked questions:
Use the magnifying glass to search by keyword:
SUPPORT
First, check the FAQ section to be sure your question can't be solved there.
To download manuals for the main elements of the Studio in a Box, click the links below:
-
Camera: Sony a6400
-
HDMI to USB converter: AJA U-TAP HDMI
-
Light: Genaray LED-6200T